
Problems with Shooting, Uploading, or QR-Code Scanning
First identify which stage did not finish: taking the photo on the device, high-resolution processing, cloud upload, or saving on the phone. Do not troubleshoot while data is still being lost.
Photo Live Error or HTTP 403 When Creating a New Session
First note the error code and description in "Current Photo Live Service Error" and send them privately to support team. HTTP 403 may mean that device or album permissions have not been approved; do not treat repeatedly changing networks or reinstalling the app as a solution.
"Continue Shooting" disables Photo Live for this shoot and keeps the form; shooting continues without automatic upload. "Return Home" cancels the new customer.
View the Two Options After a Failed Self-CheckNo New Photos or the Last Photo Is Incorrect
Stop taking additional photos. Record the camera model, connection method, countdown status, whether an external display is connected, and the shooting time. After current processing finishes, compare the originals and finished photos. If the camera reports an error, do not repeatedly reconnect or reset it; let support team investigate using the logs.
Focusing or Shooting Is Delayed at the End of the Countdown
Ask an administrator to check the pre-focus lead time first. The default is 0.6 seconds. It only half-presses early to focus and does not fully press the shutter early. Pre-focus is not used when there is no countdown or the lead time is 0. The subject should hold position during the final stage. If focusing fails, adjust the subject's position and lighting before trying again. Record the camera model, lead time, countdown duration, and whether an external display is connected, then send the details to support team for review.
View Pre-Focus SettingsWhy Hasn't the Target K Value Been Applied After Selecting Color Temperature?
Choosing "Color Temperature" only changes white-balance mode. Adjust the slider, tap "Apply Color Temperature," and wait for camera confirmation. If no response arrives, check the camera body. Restore Defaults returns white balance to Daylight.
View the Complete Color Temperature StepsView or Delete AI Sample Images You Imported
Have an administrator go to Shooting Settings → "AI Color Matching" → "Custom Import." Tap a sample image normally to open a full-size view. To select that sample and adjust its parameters, tap the parameter button in the lower-right corner of the card.
Touch and hold a custom sample to select it, or tap "Select" and choose items. Single and multiple selection are supported; tap Cancel to exit. Only imported references can be managed here, not official or theme-linked ones.
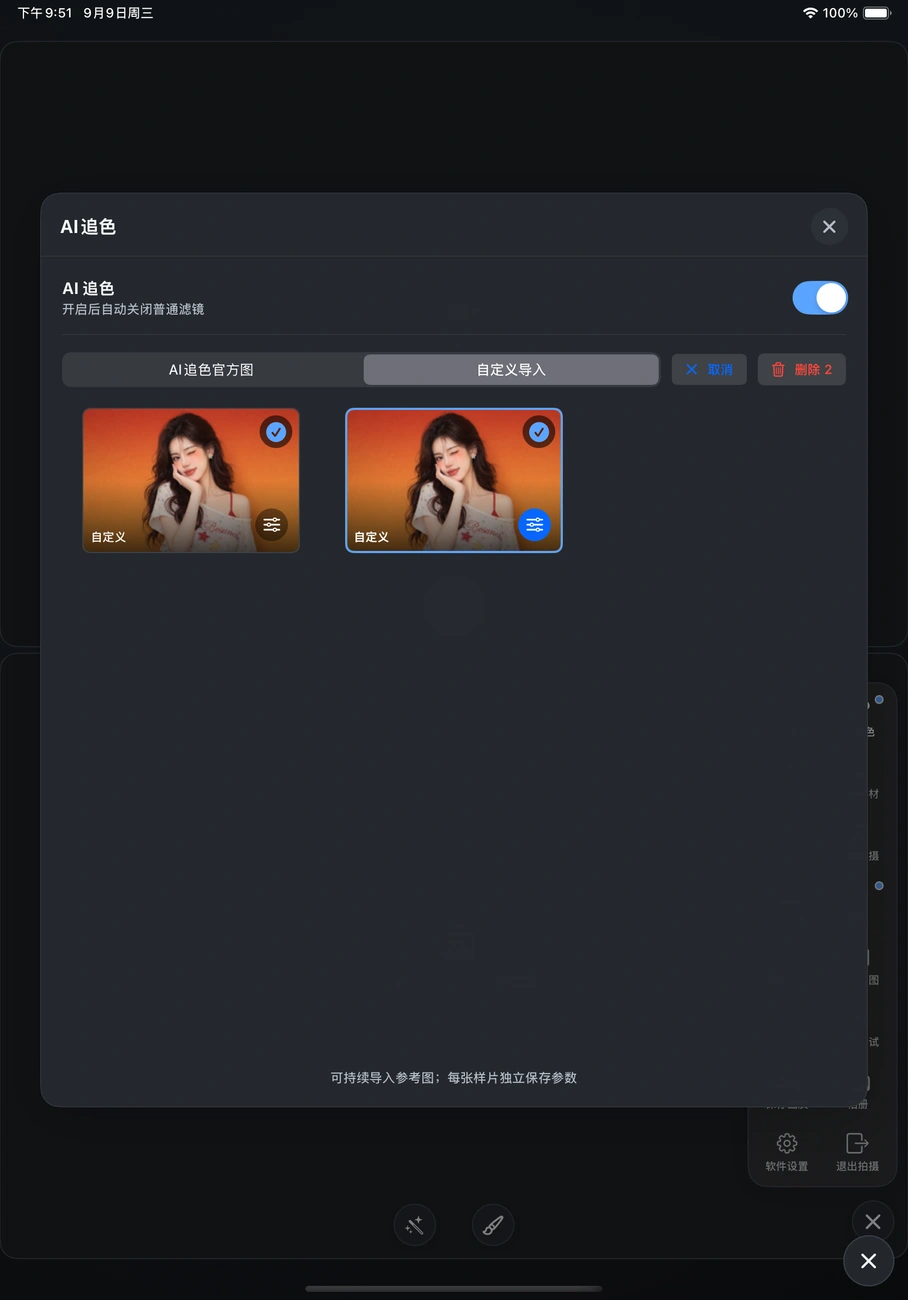
Two sample images are selected in the image. "Delete 2" in the top-right corner matches the number currently selected.
Build130 · Actual operating screenshots from the iPad simulatorAfter tapping Delete, confirm once, then check the item count and the "Cannot be recovered after deletion" warning in the second confirmation. The Delete button becomes available only after the full 5-second wait. If you are unsure, tap "Cancel." This deletes only custom AI reference samples, not captured photos in the customer album.
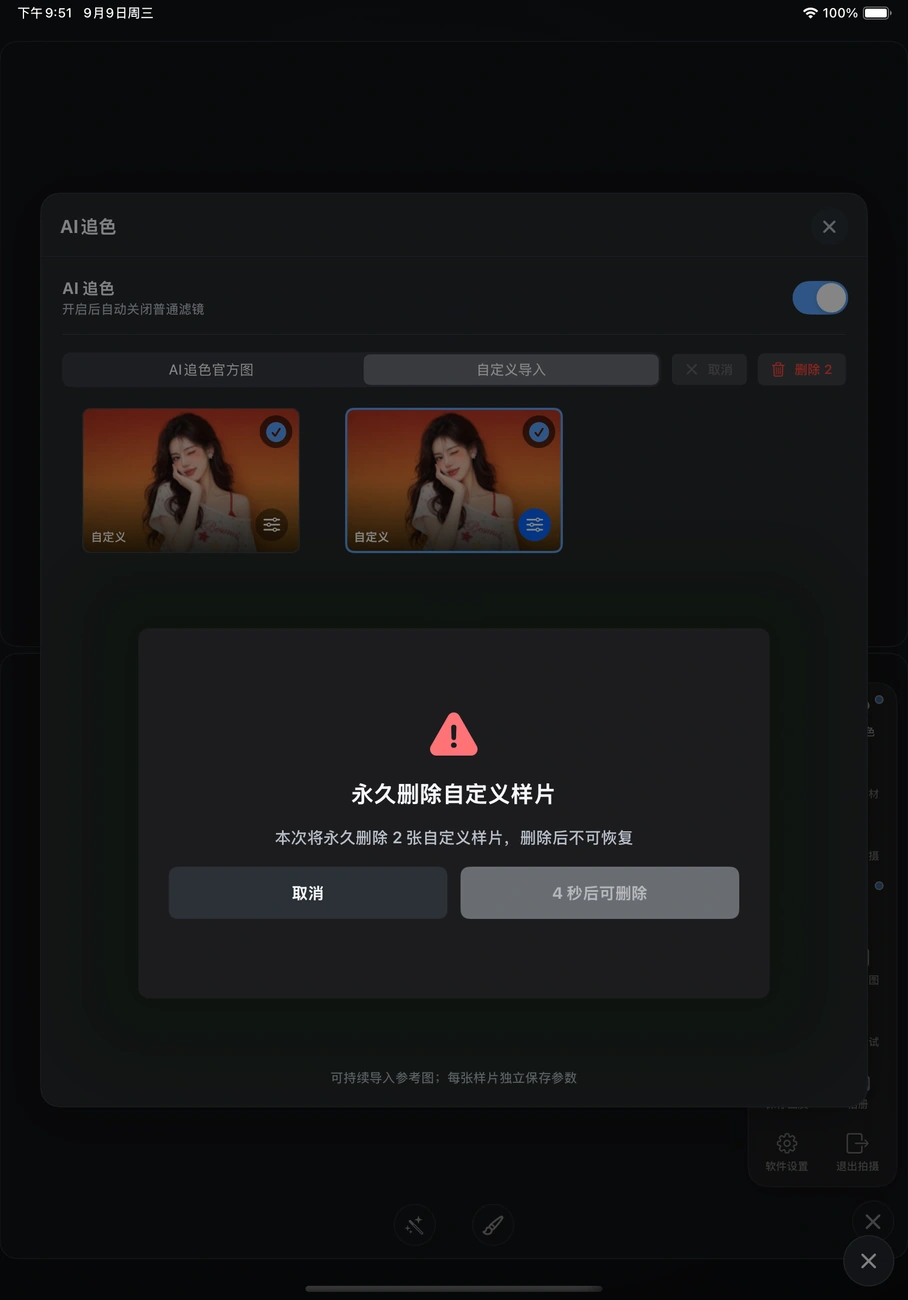
The screenshot shows an active countdown with 4 seconds remaining, so Delete is still unavailable. The full confirmation wait begins at 5 seconds.
Build130 · Actual operating screenshots from the iPad simulatorPhotos Are on the Device, but the Cloud Album Is Incomplete
Keep the iPad online and the app in the foreground while high-resolution processing and upload finish. In "Customer Photo Management," open the relevant customer and tap "Photo Live." If "Retry Upload" appears, retry as prompted. Do not delete photos that have not been uploaded.
Record finished-photo, uploaded, and failed counts plus the exact message. Ask support team to confirm service status if Photo Live access is missing, expired, or off.
The QR Code Does Not Open
First clarify whether this is "Photo Live" or "Local-Network Download." Cloud albums need working internet. Local-network download requires the phone and iPad to use the same Wi-Fi, the iPad to allow Local Network access, and the app to stay in the foreground. Get a new local-network QR code after the phone or iPad changes networks.
Public Wi-Fi may isolate devices; ask the store network manager to confirm. Do not expose iPad ports to the public internet or install unknown network configurations.
The Photo Appears on the Phone, but the Downloaded File Cannot Be Found
Choose a high-resolution photo again and use the webpage download action. Check Photos and the Files Downloads folder. If WeChat cannot download, open the link in the system browser. Confirm it is not a thumbnail; if it still fails, record the phone system, browser, and message.
Concerned About a Photo Leak or Need to Delete Photos
Do not publicly forward an album QR code or link; anyone with the link may be able to see the photos. Contact the store and support team first to confirm the deletion process. Ending Photo Live only stops new additions; it does not immediately delete existing photos. Do not treat stopping uploads as completed deletion.
Send the Exact Failed Step to Support team
门店/服务单:
设备码/App Build:
时间/相机/外屏:
本机原片/高清成片数:
云端已上传/失败数:
扫码类型(云端或局域网):
手机系统/浏览器/网络:
完整提示,以及问题出现前后的操作:
Send the completed template privately and hide customer data in screenshots. Share on the right sends only the troubleshooting guide, not photos or diagnostics.